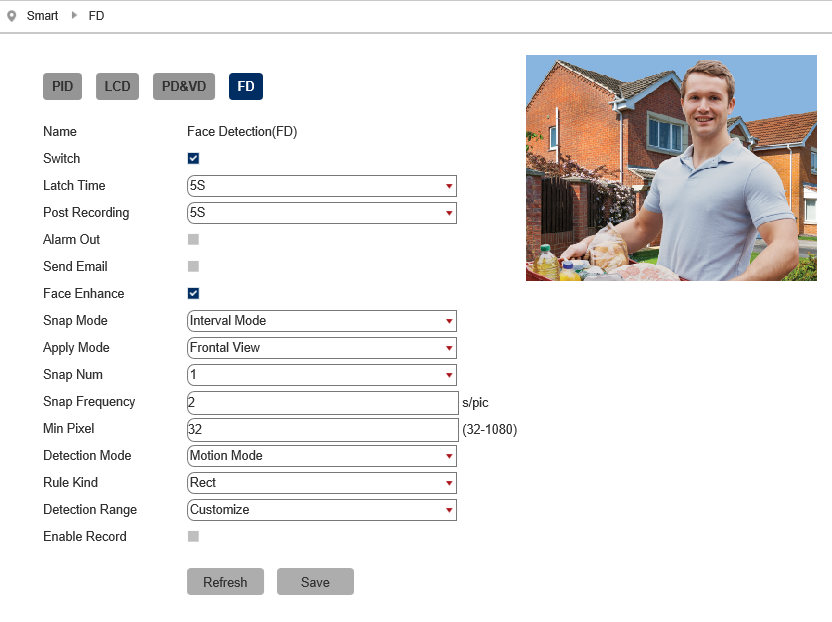
Facial detection can be set to trigger an alarm event in a custom area when it detects a face/
AI Face Recognition is available on these model NVRs:- ZIP108, ZIP116, ZIP208, ZIP308, ZIP216 and ZIP226.

Key Settings
Switch - Tick to enable this feature.
Un-Tick to disable this feature.
Latch Time - This determines how long the alarm event is deemed to be activate once triggered. Options are 5, 10, 20 and 30 seconds.
Post Recording - This determines how long the camera will record for after the alarm event has ended. Options are 5, 10, 20 and 30 seconds.
Send Email - Email alert via SMTP can be triggered and send a snapshot image of the event. Note:- Email Settings required to be set up in Network Menu for this feature.
Snap Mode - Set how the camera will capture thumbnail snapshots when triggered.
Default = Will only capture a snapshot when subjects are first detected. Additional thumbnail snapshots will only be captured if the subject leaves the camera's image and returns
Realtime: Only capture a snapshot from just before the subject leaves the image.
Interval Mode = Customize how many and how often thumbnail snapshots are captured using the snap num and snap frequency fields.
Snap Num - Set how many snapshots are captured for each event
1 = Will capture a single snapshot when the subject is first detected.
2 = Will capture a snapshot when the subject is first detected and one further snapshot after the period of time specified in the snap frequency field if the subject is still present.
3 = Will capture a snapshot when the subject is first detected and two further snapshots, one further snapshot after the period of time specified in the snap frequency field if the subject is still present.
Unlimited = Will continuously capture a snapshot at the interval as set by the snap frequency, if the subject is still present.
Snap Frequency - Customise how often the camera will capture a snapshot (in seconds), this is a timer which will remain active as long as the subject is present. If the subject leaves the camera's image and returns a snapshot will be captured and the timer will reset.
Apply Mode - Customise the face detecting viewing angle for the most accurate face detection.
Frontal View - The camera optimizes the detection for straight on.
Multi Angle - The camera detects detects faces at various angles.
Customise - Customise to set up bespoke detection angles/
Roll Range - How far somebody can tilt their head (ear towards their shoulder) and still be detected as a face. Set the angle from 0 degrees so that a face would have to be straight to 180 degrees so that the face can be tilted 90 degrees to either side.
Pitch Range - How far a person can look up or down and still be detected. At 0 degrees the subject would have to be looking directly at the camera. At 180 degrees the subject can be looking towards the ground or towards the sky and could still be detected.
Yaw Range - How far somebody can be looking to the side and still be detected. At 0 degrees the subject would have to be looking directly at the camera. At 180 degrees the subject can be side on to the camera and could still be detected.
Min Pixel - Set the minimum trigger size, this can be set as a minimum width between 64 pixels to 1080 pixels. Customize the size depending on how far away the camera is away from the subject.
Detection Mode - How the detection will handle motion and stationary objects.
Motion mode = Will only detect moving subjects.
Static mode = Will detect moving subjects but also stationary pedestrians and vehicles are in the alarm area.
Rule Kind - Set to trigger an alarm event when a face is detected in a set area or set to trigger an alarm event when a face is detected across a custom line.
Rect - Face detection within a set area.
To create a custom detection area;
1. Set the rule kind drop down list to rect.
2. Set the detection area drop down list to customise.
3. Click on the camera's image to set the top left corner of the detection area.
4. Click the position to set the bottom left corner.
5. Click the position to set the bottom right corner.
6. Click to set the top right corner of the detection area.
Line - Face detection across a custom line. Customise the direction the line is crossed before a capture so the camera will monitor for face on entry or as people exit.
To set up line crossing face detection follow these steps:
1. Set the rule kind drop down list to line.
2. Click on the camera's image to start the line crossing.
3. Click to stop the line crossing.
4. Finally select which direction a person crosses the line before face detection is triggered from the rule type drop down list, from side A to B (A->B) or from side B to A (B->A).
Detection Range - Set the detection area for the image.
Customize = Customise a defined detection area
Full Screen = Set to Monitor the entire image
Enable Record - Tick to enable recording when the event is triggered.
Un-Tick to disable recording when the event is triggered.