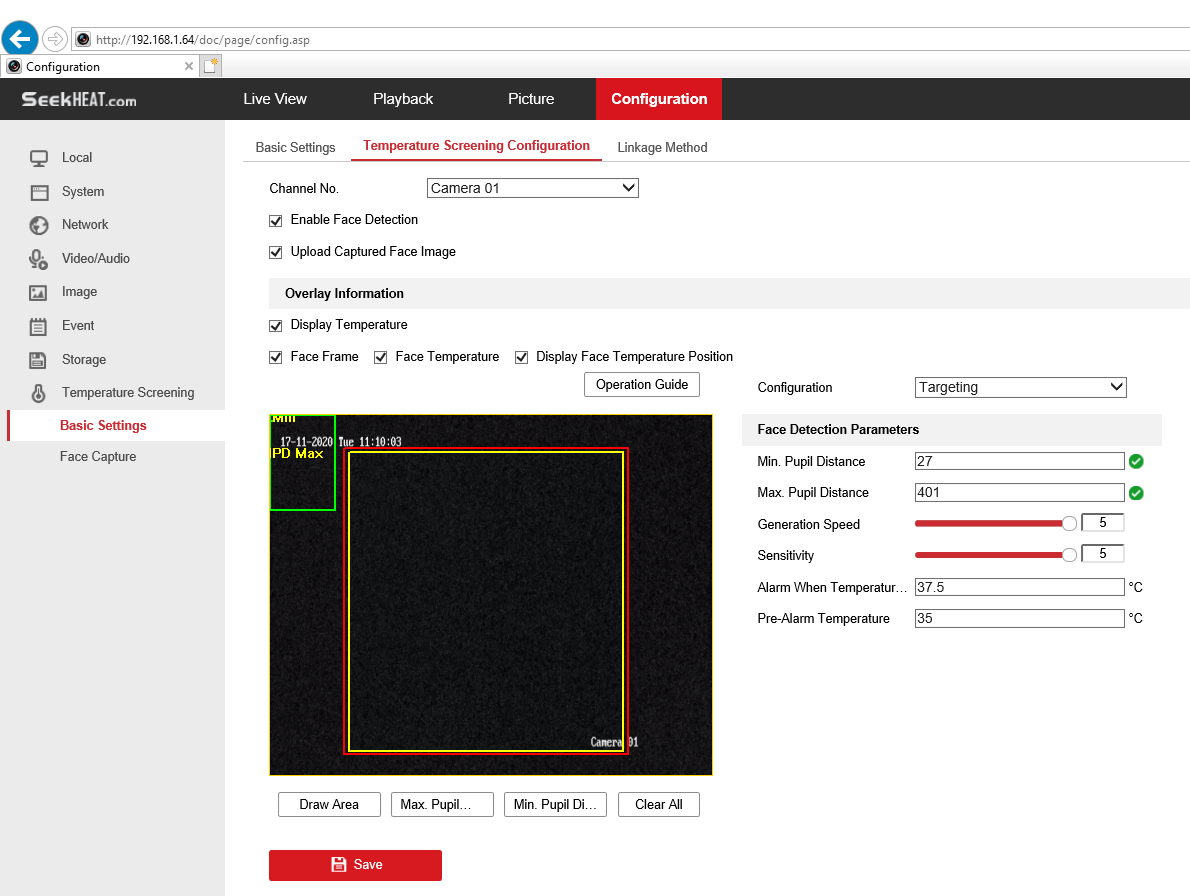
Steps:
1. Go to Configuration → Temperature Screening → Temperature Screening Configuration.
2. Select the optical channel (Camera 01).

3. Check Enable Face Detection to detect human faces, and measure the temperature in the scene.
4. Check Display Temperature to display the highest temperature of each detected face in live view.
5. Check Upload Captured Face Image to capture and upload the face image of the target. If face detection function is also enabled, max. temperature of the face displays on the image.
![]() Note
Note
Refer to face capture section to set the corresponding parameters.
6. Check Display Face Temperature Position to show a cursor on the position of max. temperature.
7. Select Configuration mode. Targeting refers to measure the temperatures for all the targets in the scene, and output alarm if the target temperature is higher than the alarm threshold.
![]() Note
Note
If temperatures of multiple targets are higher than the alarm threshold, then multiple alarms will be triggered.
8. Set the face detection parameters.
Pupil Distance: The pupil distance refers to the square size composed by the area between two pupils, and it is the basic standard for a camera to identify a target. You can enter the pupil distance value or draw pupil distance areas in live view.
Generation Speed: It refers to the target generation speed. The higher the value is, the easier the target can be detected.
Sensitivity: It refers to face detection sensitivity.
Alarm When Temperature is Above: It refers to the temperature alarm threshold. When the target temperature is higher than the setting value, the device outputs alarm.
Pre-Alarm Temperature: When the face temperature is higher than the set value, the device outputs pre-alarm and upload captured face image.
9. Click Draw Area, and draw a face detection area in live view. You can move the rectangle or drag the corners of rectangle to adjust the position and size.
![]() Note
Note
You should draw the detection area within the red rectangle.
10. Click Save.
11. Set the arming schedule and linkage methods. For the information about arming schedule settings, see Set Arming Schedule. For the information about linkage methods, see Linkage Method Settings.