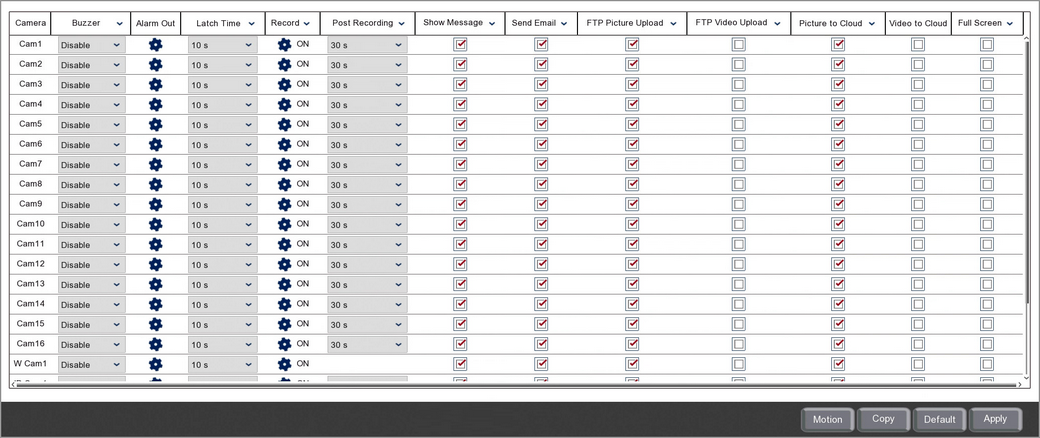
In the Motion sub-menu you can set up how the recorder reacts when motion is detected for each camera. These are also the same options you will see if you click the Alarm button when setting up motion detection.
The settings available will differ depending on recorder, camera type and camera model.

Camera
Lists all channels on the recorder.
Audio Warning
The recorder can be set to produce a loud beeping sound when motion is detected on the selected camera. From the Buzzer drop down list you can choose the length of time the recorder will sound the audio alarm for. You can also select Disable if you don't want the recorder to sound a warning when motion is detected.
Trigger An Alarm Output
You can tell the recorder to trigger alarm outputs to activate a 3rd party device such as a floodlight when motion is detected by the selected camera. Clicking the Cog icon in the Alarm Out column will open the Alarm Output window where you can dictate which alarm outputs will be triggered. Theses can be the recorder's own local alarm outputs, the alarm outputs of connected IP cameras or you can simply select All.

Latch Time
The Latch Time is the amount of time the alarm output remains active. You can set the Latch Time up to a maximum of 60 seconds using the drop down list
Record Video On Motion Trigger
The recorder can be set to capture footage from a single or multiple channels when motion is detected. Typically if motion is detected on camera 1 you would want to record channel 1. This feature however allows you trigger recording on nearby cameras at the same time or all entrances for example.
To set which channels are recorded click the Cog icon in the Record column to display the Record Channel window.

You can enable or disable channel recording by ticking or unticking the Record Channel check box.
You can then choose all analogue or all IP cameras by selecting the Analogue Channels and IP Camera check boxes. Finally you can select any combination of analogue and IP cameras by highlighting the individual channels.
Post Recording
The Post Recording time determines how long the recorder continues to capture footage for after the last movement was detected. This gives you a bit of leeway in-case the object which triggered the motion detection moves again or returns.
You can set the post recording time between 30 seconds and 5 minutes using the Post Recording drop down list.
![]() On Screen Notification
On Screen Notification
When Show Message is turned on an icon of a red man will appear in the top right corner of the screen whenever motion is detected. You can turn this feature on or off using the Show Message check box.
Email Notifications
You can set the recorder to include motion triggers in its email reports by selecting the Send Email check box. For more information on setting up emails accounts and email schedules see the Email section in the Network Menu.
FTP Uploads
You have the option to automatically upload snapshots of motion triggers or video footage covering the incident to an FTP server. You will first need to configure the FTP server connection as described in the FTP section. Once this is set up you can simply select the FTP Picture Upload and/or the FTP Video Upload check boxes.
Cloud Uploads
You can also automatically upload snapshots or video footage of motion triggers to a cloud storage account. This can be Dropbox or Google Drive. You will first need to configure your cloud storage account as described in the Cloud section. When you have set up your cloud storage account you can select the Picture To Cloud and/or the Video To Cloud check boxes.
Open Full Screen On Motion Trigger
By ticking the Full Screen check box you can tell the recorder to open the camera's image full screen when motion is detected. This is useful in control room settings where the cameras are monitored.
Setting Up Motion Detection
Clicking the Motion button will open the Motion Detection screen where you can configure motion detection for each camera. For more information on setting up motion detection see the Video Menu - Motion section.
Copying Motion Detection Alarm Settings
You can copy motion detection alarm settings from one camera to another by clicking the Copy button as explained in the Parameter Copy section.
Defaulting Settings
To restore settings back to the factory default you can click the Default button.
Saving Changes
When you are happy with the current settings click the Apply button. If you exit the window without saving any changes will be lost.