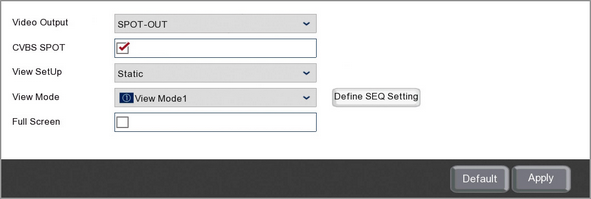
Selecting SPOT-OUT from the Video Output drop down list in the General Output sub-menu allows you to configure the BNC spot monitor output.
The spot monitor output is ideal for monitors in public areas as it will only display the cameras and won't show the menu system or the mouse cursor.

You can configure the following the settings for the recorder's BNC spot monitor output.
Enabling The Recorder's BNC Spot Monitor Output
You can enable and disable the recorder's spot monitor output by ticking or unticking the CVBS SPOT check box.
Choosing a Static Or Auto Switching Display
You have 2 options in the View Setup drop down list, Static or Dynamic. Static will show the same camera layout continuously where as Dynamic will automatically switch between selected cameras.
Choosing A Static Camera Layout
When you have Static selected from the View Setup drop down list the View Mode option will be displayed.
In the View Mode drop down list you can choose the camera layout which will be continuously displayed on the recorder's spot monitor output. You can select a single channel display or one of the various multi-channel displays from the drop down list.
Choosing Which Cameras Are Displayed In A Static Camera Layout
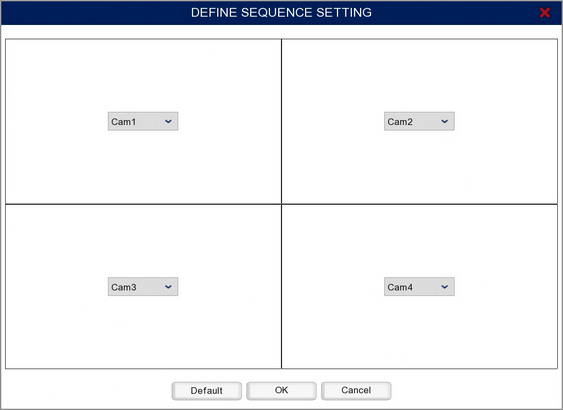
When you have set the View Mode you can then click the Define SEQ Setting button to choose which cameras appear where in the chosen layout.
Camera's can be chosen from the drop down lists for each camera position.

Choosing An Auto Switching Camera Layout
When you have Dynamic selected from the View Setup drop down list the Seq Mode option will be displayed.
In the Seq Mode drop down list you can choose the camera layout which will be used for the auto switching display on the recorder's spot monitor output. You can select a single channel display or one of the various multi-channel displays from the drop down list.
Setting The Auto Switch Timing
You can choose the amount of time the recorder displays each camera layout before moving on to the next in the SEQ Dwell Time field. This is a free text field where you can specify in seconds how long the recorder should display each layout.
Choosing Which Cameras Appear In An Auto Switching Display
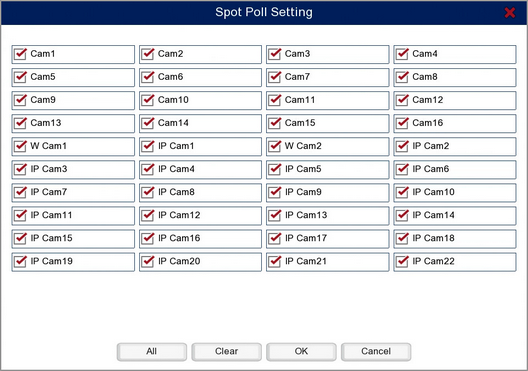
When you have set the Seq Mode you can then click the Spot Poll Setting button to choose which cameras you want to include in the auto switching display.
To include or exclude a camera simply tick or un-tick the corresponding check box.
When set to a single camera layout, if a camera is ticked to be included but there isn't actually a camera connected the recorder will just skip this camera.

You can also select or deselect all cameras at the same time by clicking the All or Clear buttons respectively.
Enabling Full Screen On Motion Or Alarm Trigger
In the Alarm Menu you can configure the recorder to display a camera's image full screen when motion is detected, an alarm is triggered or a smart detection feature is triggered.
By default this is only happens on the HDMI and VGA live view display. If you want the BNC spot monitor output to do the same simply tick the Full Screen check box.
Defaulting Settings
To restore settings back to the factory default you can click the Default button.
Saving Changes
When you are happy with the current settings click the Apply button. If you exit the window without saving any changes will be lost.