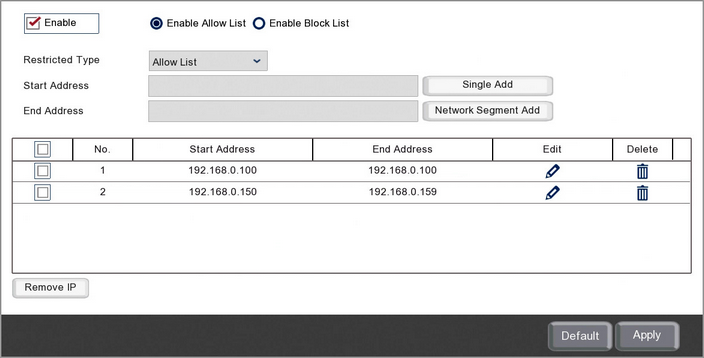
With the IP Filter you can restrict access to the recorder to specific IP addresses making your system more secure by creating an Allow List. Alternatively you could just block troublesome IP addresses by creating a Block List.

Enabling IP Filters
You can enable and disable the IP Filter by ticking or unticking the Enable check box.
Once the IP Filter is turned on you need to decide if you want to enable the Allow List or the Block List by highlighting the corresponding radio button.
The IP Filter can only be configured when enabled.
Creating Lists
You can create 2 types of lists in the IP Filter menu, an Allow List which lets the specified IP addresses access the recorder or a Block List which prevents specified IP addresses accessing the recorder.
To create a list you will first need to select Allow List or Block List from the Restricted Type drop down list.
Adding A Single IP Address
To add a single IP address to your selected list simply enter it into Start Address field and click the Single Add button.
Adding An IP Address Range
To make things easier you can add a range of consecutive IP addresses rather than having to add each one in turn.
To add an IP address range to your selected list enter first IP address into Start Address field, the last IP address into the End Address field and click the Network Segment Add button.
![]() Editing An IP Address or Address Range
Editing An IP Address or Address Range
To edit an IP address or range follow these simple steps:
1.Select the Allow List or Block List from the Restricted Type drop down list.
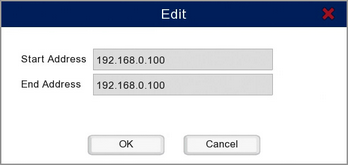
2.Click the Pencil Icon in the Edit column on the IP address or range you want to amend to display the Edit window.
3.Amend the Start Address and End Address as required then click the OK button.

![]() Deleting An IP Address or Address Range
Deleting An IP Address or Address Range
There are 2 ways you can delete a an IP address or range. When deleting a single record you can click the Rubbish Bin icon in the Delete column. When deleting multiple records you can tick the check box for each IP address or range you want to delete and then click the Remove IP button.
A warning message will be displayed asking if you want to delete the selected IP addresses. You can either click OK to delete the IP addresses or Cancel exit without deleting.
Defaulting Settings
To restore settings back to the factory default you can click the Default button.
Saving Changes
When you are happy with the current settings click the Apply button. If you exit the window without saving any changes will be lost.