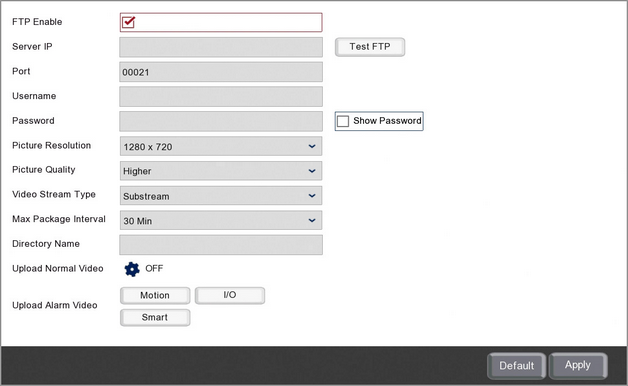
The FTP sub-menu allows you to connect your recorder to an FTP server (File Transfer Protocol) so that you can schedule uploads of snapshots and video footage.
This handy feature gives you extra protection as it allows you to automatically save a copy of your CCTV footage. The FTP server could even be off-site for maximum security with your footage saved in 2 locations.
After configuring your FTP settings you will need to set up an FTP Schedule so the recorder knows what to upload to your FTP server and when.

Enabling The FTP Upload Feature
You can enable or disable FTP uploads by ticking or unticking the FTP Enable check box.
Server IP
This needs to be the IP address of the FTP server you are wanting to connect to.
Port
This needs to be your FTP server port. By default this will be set to 21 as this standard port used for most FTP servers. You can usually leave this as it is.
Username & Password
These are the credentials you normally use to log on to the FTP server. If you don't have log credentials you may need to ask whoever manages the FTP server for credentials you can use or to create a user account for you.
Picture Resolution
You can choose the resolution of the snapshots the recorder will upload to the FTP server in the Picture Resolution drop down list.
Picture Quality
You can choose the quality of the snapshot uploaded from the Picture Quality drop down list.
The Picture Quality works hand in hand with the Picture Resolution to produce the final image uploaded. If you were to set the Picture Resolution to 1080P (1920 x 1080) but the Picture Quality to Lowest, the end result would still be a 1080P sized image but the detail in the image would be poor.
Video Stream Type
The Video Stream Type drop down list allows you to choose the quality of any video footage uploaded to the FTP server. You can choose between the Mainstream or Substream. The quality of the Mainstream and Substream recording is configured in the Record - Encode section.
Max Package Interval
You can set the amount of time between FTP uploads in the Max Package Interval drop down list. This can be set from 10 minutes up to 60 minutes. The recorder will only attempt to do an upload when there is new snapshots or video footage waiting to go.
On busy systems which capture a lot of footage you may want to do more frequent uploads so that you aren't uploading a large number of files at any one time. Likewise, on systems which don't capture much footage it may be worth setting the interval to 60 minutes so that files are uploaded in chunks rather than little bits here and there.
Directory Name
This is the name of the folder on the FTP server where your snapshots and videos will be saved. You can enter the name of a folder that already exists and any uploads will be saved in there. Alternatively you can enter the name of a new folder that doesn't exist an this folder will then be created automatically.
Upload Normal Video
By default only video footage from alarm triggered events will be uploaded to the FTP server. You can however upload any normal scheduled recordings as well.
To set which channels you want to upload the normal video recordings for click the Cog icon to display the Upload Normal Video window.

You can enable or disable normal video uploads by ticking or unticking the Upload Normal Video check box.
You can then choose all analogue, all IP or all USB wireless cameras by selecting the Analogue Channels, IP Camera or USB Wireless check boxes. Finally you can select any combination of analogue, IP or USB wireless cameras by highlighting the individual channels.
Upload Alarm Video
For alarm triggered snapshots and videos to be included in the FTP upload you need to enable FTP Picture Upload and FTP Video Upload for each channel required. This is done for each event type as shown in the Alarm Menu - Motion, Alarm Menu - I/O and Alarm Menu - Smart sections.
You can quickly access the alarm menus by clicking the Motion, I/O and Smart buttons.
Test FTP
Once you have entered all of you FTP server settings you can send a test the connection by clicking the Test FTP button.
Defaulting Settings
To restore settings back to the factory default you can click the Default button.
Saving Changes
When you are happy with the current settings click the Apply button. If you exit the window without saving any changes will be lost.