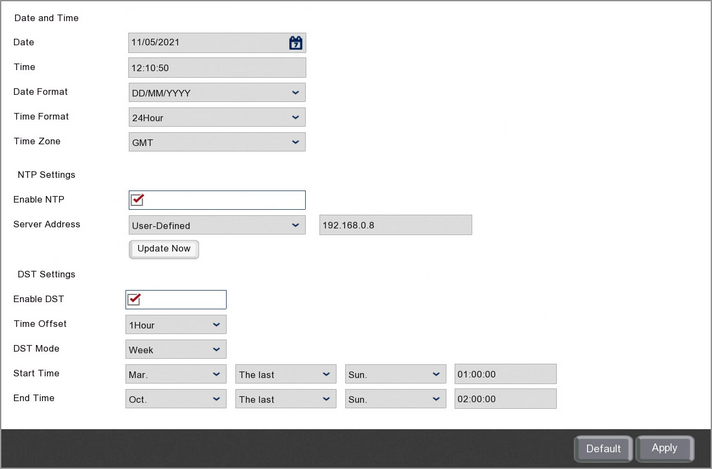
You can configure everything regarding the recorder's date and time in the Date And Time sub-menu.
It's important to have the correct date and time set so that schedules activate at the desired time. It will also ensure that the correct date and time are overlayed on to recorded footage and snapshots. Footage with incorrect time or date could be unusable as evidence as an event could appear to occur at a different time to when it when it was reported to have happened.

![]() Manually Setting The Date And Time
Manually Setting The Date And Time
The easiest way to set the recorder's date and time is to use the NTP feature which will automatically retrieve the correct date and time from the network or router. However if you have not networked your recorder you can still set the date and time manually as described below.
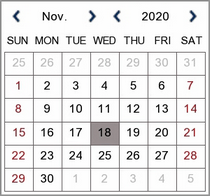
To set the Date just click on the Calender icon to display the mini calender and select the current date.

To set the Time just click inside the Time field and use the on-screen keypad to enter the correct time.
If your recorder had been networked but you still wish to set the date and time manually make sure you disable NTP so that the date and time aren't updated automatically.
Date Format
You have 3 options for how the date is displayed which can be selected from the Date Format drop down list:
•MM/DD/YYYY (Month/Day/Year)
•YYYY-MM-DD (Year-Month-Day)
•DD/MM/YYYY (Day/Month/Year)
Time Format
You can choose whether to use a 24 hour clock (17:30) or a 12 hour clock (5:30pm) from the Time Format drop down list. If you choose to use a 12 hour clock a new drop down list will appear next to the Time field so that you can set the time as AM or PM.
Time Zone
You have the option to change the time zone so that you can use the recorder outside of the UK. This can be done in the Time Zone drop down list where you can specify how many hours your region is in front or behind GMT.
Enabling NTP Automatic Date And Time
If your recorder has been networked, we recommend using the NTP (Network Time Protocol) feature which uses a time server to automatically set the correct date and time. This is an easy, hassle free way to ensure your recorder always has the correct date and time.
To configure NTP follow these steps:
1.Tick the Enable NTP check box.
2.Select the time server you want to use from the Server Address drop down list. There a 3 public time servers you can choose, time.windows.com, time.nist.gov or pool.ntp.com. Alternatively if you have access to a private time server you can select User-Defined and enter the server's IP address.
3.Once you have selected you time server click the Update Now button to set you recorder to the correct date and time.
Setting Up Daylight Saving Time
You can enable Daylight Saving Time (DST) so that the recorder keeps the right time when the clocks go forward or back. To do this follow these simple steps:
1.Tick the Enable DST check box to turn on Daylight Saving Time. The default settings are already configured for the UK so this is all you need to do. If you are using the recorder outside the UK proceed to step 2.
2.You can set the amount of time the clock moves forwards and back from the Time Offset drop down list.
3.DST can be set to occur on a specific Date or Week. You can choose the relevant option in the DST Mode drop down list.
4.You can set when the clocks move forward by setting the Start Time. The options available will differ depending on DST Mode as shown below:
Week - set the month, the week in the month, the day of the week and the time of day the clocks go forward.
Date - select the date and the time of day the clocks go forward.
5.Finally set when the clocks move back by setting the End Time. The options available will differ depending on DST Mode as shown below:
Week - set the month, the week in the month, the day of the week and the time of day the clocks go back.
Date - select the date and the time of day the clocks go back.
Defaulting Settings
To restore settings back to the factory default you can click the Default button.
Saving Changes
When you are happy with the current settings click the Apply button. If you exit the window without saving any changes will be lost.