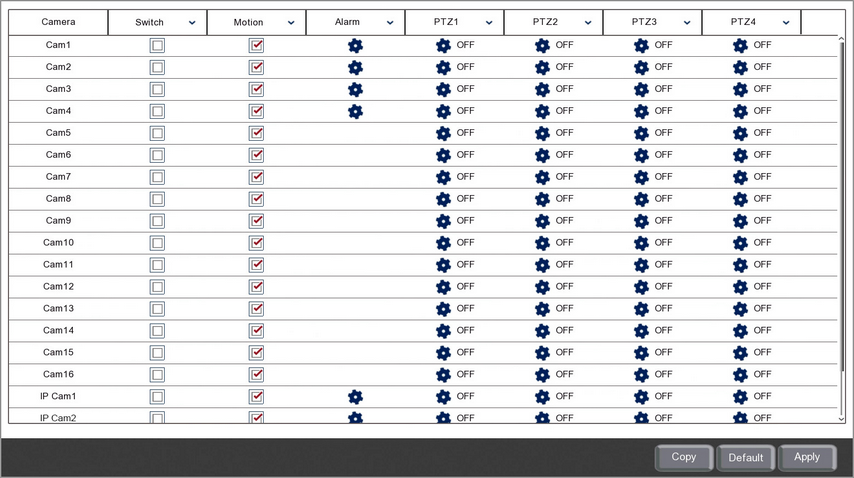
The PTZ Linkage sub-menu is a great way enhance your security system. It allows you to tell PTZ cameras to move to a specific location when an alarm input is triggered or motion detected by another camera. This is achieved by activating one of the PTZ's preset locations.
This could be used to tell one PTZ to look at the main gate and a second PTZ to look at the rear entrance when a PIR detects movement for example.
The settings available will differ depending on recorder, camera type and camera model.

Setting Up PTZ Linkage
1. Selecting Your Camera
The first thing you need to do is choose which camera you want to set up PTZ linkage for. The Camera column shows all analogue and IP cameras connected to the recorder. Once you have found the camera you want to configure, tick the Switch check box to enable PTZ linkage for that camera.
2. Using Motion Detection To Control PTZ Cameras
You can use the motion detection of any analogue or IP camera to control up to 4 PTZ cameras.
If you want to use a camera's motion detection to trigger PTZ movement you need to tick the Motion check box. Likewise, if you don't want to use a camera's motion detection only its alarm inputs, you can un-tick the Motion check box.
For more information on setting up motion detection see the Video Menu - Motion section.
3. Using Alarm Inputs To Control PTZ Cameras
Alarm input triggers can also be used to control PTZ cameras. These can be the alarm inputs on the recorder itself or the alarm inputs on connected IP cameras.
The recorder's alarm inputs are paired to the corresponding camera inputs. So alarm input 1 is paired to camera 1 and so on.
To choose which alarm inputs to use as a PTZ trigger click the Cog icon in the Alarm column. This will display all available alarm inputs for the selected camera.

You can enable or disable each alarm input trigger by ticking or unticking the check box.
4. Selecting Which PTZ Cameras And Presets To Trigger
Once you have set up how the PTZs will be triggered you can choose which PTZs and which presets to activate. You can select up to 4 PTZs for each camera and choose a preset location for each one.
To configure a PTZ camera click the Cog icon in the PTZ1, PTZ2, PTZ3 or PTZ4 column.

Here you can tick or un-tick the check box to enable or disable the PTZ activation. You then can select which PTZ you want to activate from the first drop-down list.
The second drop-down list will then be populated with all of the previously saved presests for the selected PTZ camera. You can then select which preset location you want the PTZ camera to look at when activated.
To see how to set up PTZ presets see the Live View Toolbar - PTZ Controls section.
Copying PTZ Linkage Settings
You can copy PTZ linkage settings from one camera to another by clicking the Copy button as explained in the Parameter Copy section.
Defaulting Settings
To restore settings back to the factory default you can click the Default button.
Saving Changes
When you are happy with the current settings click the Apply button. If you exit the window without saving any changes will be lost.