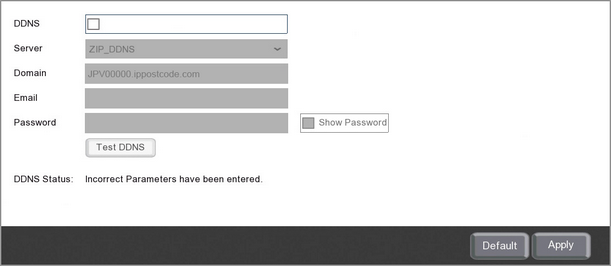
If you do not have a static IP address for your router then your routers public IP address assigned by your internet service provider can change periodically. DDNS (Dynamic Domain Name System) is used so that your remote device can still access your recorder when the address changes. The recorder periodically updates the DDNS server with the routers public IP address and the software or mobile app gets the address from the server to connect to the recorder.
Every Zip recorder is supplied with a free, 3 year DDNS service for its user. This allows you to quickly set up the recorder for remote monitoring, without the added expense or hassle of setting up a static IP.
The easiest way to set up a recorder for remote monitoring is to use the P2P feature where you scan a QR using the mobile app and the recorder's settings are configured for you. You can find out more about this in the P2P section.
When setting up your recorder using P2P you don't need to worry about DDNS as everything is done automatically. If you are unable to set up remote monitoring via P2P you will need to configure DDNS as explained below and Port Forwarding.
You only need to set up port forwarding and DDNS if you intend to monitor your CCTV using the Zip Vision mobile app, PC client or IE web client.

Enabling DDNS
To configure DDNS follow these simple steps:
1.Tick the check box to enable DDNS.
2.Select ZIP-DDNS from the Server drop down list.
3.The Domain will be the recorder's serial number follwed by .ippostcode.com e.g. JPV000000.ippostcode.com
4.In the Email field enter the email address you want the authentication password sent to. (This may take a few minutes to come through)
5.Enter the authentication password you received by email into the Password field.
6.Click the Test button to check everything is working.
Remote Monitoring
With DDNS and Port Forwarding now set up you can connect to your recorder remotely using the Zip Vision PC client software, mobile app or in the Internet Explorer browser. Just enter the recorder's serial number follwed by .ippostcode.com e.g. JPV000000.ippostcode.com.
To log on to the recorder you need to enter the same username and password as you would on the recorder itself.
Monitoring Multiple Recorders Connected To The Same Router
If you intend to remotely monitor multiple recorders connected to the same router you only need to setup DDNS for 1 recorder. This is because the ippostcode.com address targets the router and not a specific recorder. You can then pinpoint the recorder you want to connect to using the unique Client Port. For more information on setting up port forwarding for multiple recorders see the Port Configuration section.
Defaulting Settings
To restore settings back to the factory default you can click the Default button.
Saving Changes
When you are happy with the current settings click the Apply button. If you exit the window without saving any changes will be lost.