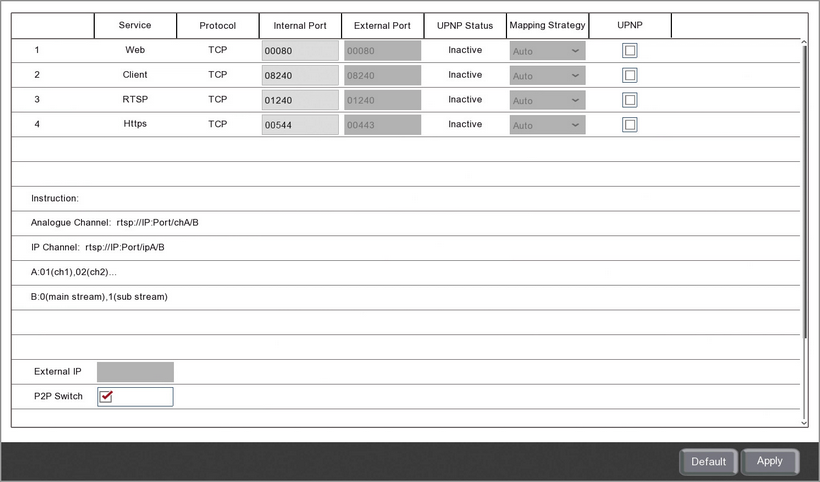
In the Port Configuration sub-menu you can configure port forwarding to tell your router which ports to use for remote monitoring over the internet.
The easiest way to set up a recorder for remote monitoring is to use the P2P feature where you scan a QR using the mobile app and the recorder's settings are configured for you. You can find out more about this in the P2P section.
When setting up your recorder using P2P you don't need to worry about port forwarding as everything is done automatically. If you are unable to set up remote monitoring via P2P you will need to configure port forwarding as explained below and DDNS.
You only need to set up port forwarding and DDNS if you intend to monitor your CCTV using the Zip Vision mobile app, PC client or IE web client.

When setting up port forwarding there a 4 ports that you need to specify; Web, Client, RTSP and Https.
Once you have set up port forwarding you can test everything is working OK at www.zipdvr.com/connect
Setting Up Port Forwarding - UPnP
The easiest way to configure port forwarding is using UPnP automatic port forwarding (Universal Plug and Play). If your router supports UPnP you can set the ports in the recorder which will then communicate with your router for you.
To set up port forwarding using UPnP just follow the steps below:
1.Tick the UPnP check box for each of the 4 ports to enable it.
2.Set the Mapping Strategy drop down list for each of the 4 ports to Manual.
3.Set the External Ports as followed:
•Web (HTTP) = 00080
•Client = 08240
•RTSP = 01240
•HTTPS = 00544
Note: The Mapping Strategy can be set to Auto and then the router will automatically assign External Ports. However, this can cause problems as the router may assign different ports in the future so streaming links will be broken as they will still try to connect using the old settings.
Setting Up Port Forwarding - Web Interface
If your router does not support UPnP you will need to set the ports manually in the router itself. This can be done by accessing your router's web interface via a browser.
This process will be slightly different for each router. To see how this is done you may need to look online for information regarding your router or contact your internet service provider if the router was supplied by them.
When setting the ports manually they should be set as listed below:
•Web (HTTP) = 00080
•Client = 08240
•RTSP = 01240
•HTTPS = 00544
Setting Up Port Forwarding For Multiple Recorders
If you have multiple recorders connected to the same router you will need to set up port forwarding for each recorder separately and they can not share ports. To keep things easy we recommend just increasing the port number by 1 each time. For example:
•Recorder 1 - Web = 00080 / Client = 08240 / RTSP = 01240 / HTTPS = 00544
•Recorder 2 - Web = 00081 / Client = 08241 / RTSP = 01241 / HTTPS = 00545
•Recorder 3 - Web = 00082 / Client = 08242 / RTSP = 01242 / HTTPS = 00546
RTSP Streaming Links
The "Instructions" show how you would input an RTSP stream link if you wanted to view a camera from your recorder on another device.
When connecting to a channel on your recorder you would enter the RTSP stream link as followed:
rtsp:// |
Recorder's IP Address |
: |
Recorder's RTSP Port |
/ |
Channel Type |
Channel Number |
Stream Quality |
|
This can be found in Network Menu - General |
|
If you are streaming from a recorder on the same network use the Internal port otherwise use the External port. |
|
Analogue = ch IP = ip |
01, 02, 03 etc |
Mainstream = 0 Substream = 1 |
For example if you wanted to view the mainstream of an analogue camera on channel 1, from a recorder with an IP address of 192.268.0.1 and with the RTSP port set as 01240 it would look like this;
rtsp://192.168.0.1:01240/ch010
If you wanted to view the substream of IP channel 3, from a recorder with an IP address of 192.268.0.1 and with the RTSP port set as 01240 it would look like this;
rtsp://192.168.0.1:01240/ip031
External IP Address
The External IP address can not be set manually as this is not something you need to set. When the ports set UPnP and auto mapping the external IP address will be allocated automatically.
Enabling And Disabling P2P ID
You can enable and disable P2P ID by ticking or unticking the P2P Switch check box.
You may want to do this once you have networked recorder and set up remote viewing to prevent others from gaining easy access to your recorder.
Defaulting Settings
To restore settings back to the factory default you can click the Default button.
Saving Changes
When you are happy with the current settings click the Apply button. If you exit the window without saving any changes will be lost.