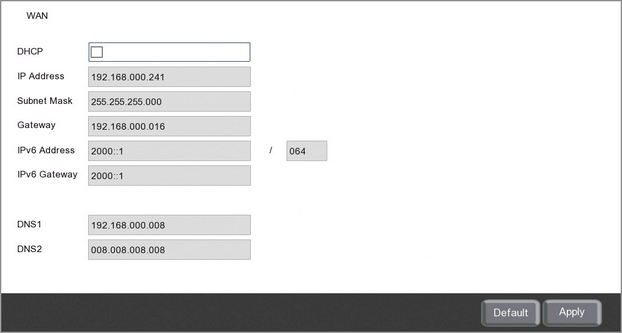
In the General sub-menu you can set up the recorders network settings. Setting your recorder up on a network will allow you to remotely monitor the recorder from a PC, tablet or mobile phone once either P2P setup or port forwarding has been configured. You can also connect to IP cameras on the same network, send email notifications and schedule automatic FTP uploads.
Your recorder should be plugged in to a network or router before you make changes in this section.

Local Connection Settings
Selecting DHCP the easiest way to complete this section as it will allow the network to automatically set the IP address, subnet mask, gateway, IPv6 address and IPv6 gateway.
Once the network parameters have been set, deselect DHCP to lock in the credentials and to prevent the network re-assigning them in the future. These credentials are what the software and apps use when looking for the recorder over the internet so if they change the software wont be able to find the recorder.
If you know what credentials you wish to use, such as a static IP address, you can de-select DHCP and enter them manually.
Note: If your IP Address, Subnet Mask and Gateway show as 000.000.000.000 this means that your recorder is not connected to the router.
DNS Settings
Selecting DHCP will automatically assign the DNS addresses from the router. This is usually the service provider's DNS address. DNS2 is automatically assigned as 8.8.8.8 which is Google's primary DNS address.
The default DNS addresses are usually adequate for most people but if you wish to set the DNS addresses manually you can de-select DHCP to do so.
Defaulting Settings
To restore settings back to the factory default you can click the Default button.
Saving Changes
When you are happy with the current settings click the Apply button. If you exit the window without saving any changes will be lost.