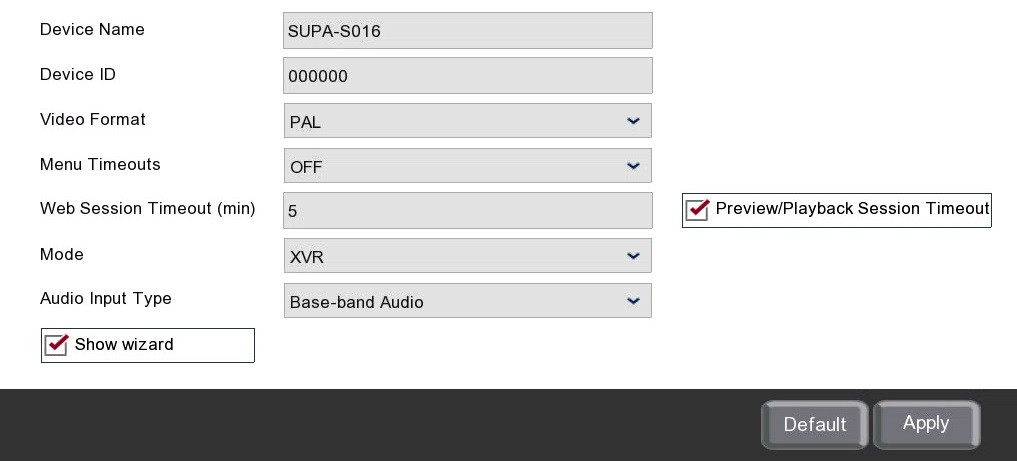
In the General sub-menu you can see key information, and edit key recorder options like the Menu Timeouts.

Device Name
You can enter a more recognisable name for the recorder in the Device Name field to make it easier to identify the recorder when using other software and services. The Device Name will be shown as the name of the recorder in the device list on the Zip PC client software and the Zip mobile apps. This is especially useful when you have multiple recorders as you can quickly distinguish which recorder is which.
Device ID
Setting a unique Device ID is a good idea if you are going to have multiple recorders in close proximity to each other. When using the recorders IR remote control you can specify which ID you want to control. By default all recorders have the same ID (000001). If all recorders are left as the default ID, you would unintentionally control every recorder within range of the IR range simultaneously rather than just the 1 recorder you did want to control.
For more information on selecting an ID to control a single recorder see the Operation - IR Remote Control section.
Video Format
You can select the format of the recorder's video output from the Video Format drop down list. You can choose between PAL or NTSC.
Menu Timeouts
For security reasons the recorder will ask you to re-enter your password if you try to control it after a period of inactivity. This is to prevent anybody from accessing the recorder without authorisation.
You can set how long the period of inactivity must be before the recorder asks for the password again from the Menu Timeouts drop down list. By default this is set to 30 seconds but it can be set up to 10 minutes.
You can also disable the menu timeout all together by selecting Off, however we don't recommend this.
Mode
Setting the Mode dictates what type of cameras the DVR can take on its analogue channels and what resources are available.
XVR - Allows you to switch analogue channels to IP channels in the Video - Channel Config sub-menu. By doing this you could have IP cameras on every channel if needed. The only downside is the extra resources the DVR allocates to processing the extra IP cameras means that there is a drop in the maximum frame rate available.
DVR - When setting the Mode to DVR you can not switch the analogue channels to IP to gain extra IP cameras. You can still add the usual IP cameras in addition to the analogue channels but the amount of supported IP cameras depends on the model of DVR (See Max IP Cameras). This is a good option if you don't require any extra IP cameras as the resources saved from processing them can be used on the analogue channels instead. These extra resources can be used to increase the maximum frame rate of you analogue cameras.
Audio Input Type
Setting the Input type determines which audio inputs are used.
Base-band Audio - Sets the audio type to the physical RCA Phono type connection on the back of the recorder. This type of audio input requires a audio input connection or microphone to be wired into the back of the recorder.
Coaxial Audio - In order to use compatible Zip audio of coax cameras, coaxial audio needs to be set. The audio is captured at the camera and then set along side the video and then decoded in the recorder.
Ensure Audio (Volume) is enabled for each channel in the record menu to record the audio with footage to then playback. If not the audio will only be heard when looking at the live view / preview on the DVR or via the Zip Vision Pro App.
Set this in Record - Encode - Mainstream and Record - Encode - Substream
Show Wizard
You can enable or disable the Smart Setup Wizard by ticking or un-ticking the Show Wizard check box. When enabled the Smart Setup Wizard will be displayed every time the recorder starts up.
Defaulting Settings
To restore settings back to the factory default you can click the Default button.
Saving Changes
When you are happy with the current settings click the Apply button. If you exit the window without saving any changes will be lost.