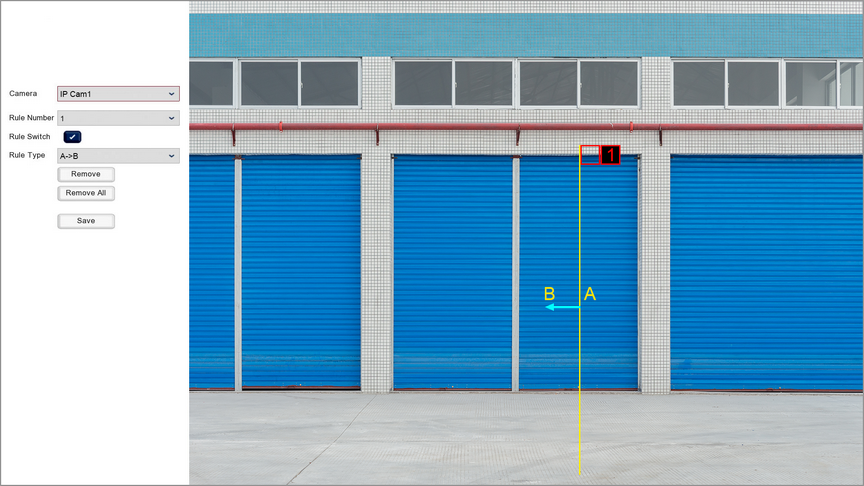
When you click a camera's Setup icon in the LCD sub-menu the LCD Setup screen will be displayed.
In the LCD setup screen you can create up to 4 line crossings which allows you to monitor movement across these imaginary barriers.

Selecting Your Camera
You can select the camera you want to configure line crossings for from Camera drop down list.
Selecting A Line Crossing
Your can create and configure up to 4 line crossings for each camera. These line crossing configurations are called Rules. You can select which Rule you want to create or edit by selecting it from the Rule Number drop down list.
To make things easier you can quickly tell which line crossing belongs to which Rule as it has a red Rule Number at the start of the line.
Creating A Line Crossing
To create a line crossing just follow these easy steps:
1.Select the Rule Number you want to create the line crossing for from the Rule Number drop down list.
2.Click on the camera's image where you want to start the line crossing.
3.Click where you want to stop the line crossing.
You will notice as you are setting your points the recorder will draw a yellow line between them.
Editing A Line Crossing
You can edit an existing line crossing as followed:
1.Select the Rule Number you want to edit the line crossing for from the Rule Number drop down list.
2.Click the red square at the start of the line.
3.Click and drag the the start and end points to reposition them.
4.Click the red square at the start of the line to confirm and set the new positions.
Enabling And Disabling Individual Line Crossings
You can turn each of the camera's 4 Rules On or Off independently as and when they are needed as described below:
1.Select the Rule Number you want to turn On/Off from the Rule Number drop down list.
2.Using the Rule Switch check box you can then turn the rule On (ticked) or Off (unticked).
Trigger On When The Line Is Crossed From 1 Direction Or Both
There are 3 options as to what direction of movement will trigger LCD. We call these options Rule Types.
For simplicity we label the area on one side of the line A and the area on the other side of the line B. The direction of movement is also indicated by the light blue arrow in the middle of the line. To choose a Rule Type first select the Rule Number you want configure then select a Rule Type as described below from the Rule Type drop down list.
•A->B - This option will only trigger when an object moves across the line from side A to side B.
•B->A - This option will only trigger when an object moves across the line from side B to side A.
•A<->B - This option will trigger when an object crosses the line in either direction.
Deleting Line Crossings
You have 2 options when removing line crossings from a camera; you can remove individual line crossings or all line crossings as explained below:
Remove Line Crossings
To remove a line crossing click the Red Square at the start of the line to select it and then click the Remove button to delete it.
Remove All Line Crossings
To remove all line crossings from the chosen camera simply click the Remove All button.
Saving Changes
When you are happy with the current settings click the Save button. If you exit the window without saving any changes will be lost.